Thursday, August 11, 2011

Barry Gwin's Vespa Clutch Compressor Tool

I called First Kick Scooters yesterday to see if they had a clutch compressor tool in stock. They did not, but I was told they just use a bolt with washers and nuts to compress clutches that come in their shop.

Then I called SF Scooter Centre and they had them in stock for $20. I stopped by to pick one up as opposed to risking damaging mine without the correct tool and Barry said, make your own. Don't buy this $20 one. He usually sells his Home Depot version ones for $5, but was all out. He drew up his design and sent me on my way.

It costs me $2.25 to make and I tested it in Home Depot and it worked great. Here's what I bought:
- 1/2 inch wing nut
- two 1/2 inch washes
- 1/2x3 inch carriage bolt

The idea is the taper on the carriage bolt is similar to the taper in the clutch. I made sure that my carriage bolt easily and freely turned so it would not score my taper in my clutch. So I guess in theory this is just like using washers, nuts, and a bolt, because my taper is not fitting the sleeve perfectly. I quickly compress, remove the circlip, and release the pressure in case this design puts undue pressure on the clutch since it is not pulling from the sleeve. I do know it is not in contact with the brass ring nut as it sits on the lip above it.

I hit Ace Hardware up yesterday, but they did not have large enough carriage bolts, so I used washers, nuts and a bolt and it worked fine if you're in a jam.

Homemade tool for the brass nut on the clutch

Thanks to Derek G. who transformed a deep socket on a lathe into this beautiful tool for me.
Derek said "The tool came out perfect. There is a .001 interference fit, so you have to push it onto the brass nuts, which keeps it tight. "

Wednesday, August 10, 2011

Lessons learned from complete clutch rebuild

Not surprisingly, I learned that Tom G. was correct about why the needle bearings were binding. This evening I disassembled the clutch 100% (yet again) and with a few taps all of the oiled needle bearings fell out. Furthermore, they all we reinstalled very easily around the circumference of the race. There was no binding.
A couple things to note:
(1) The entire clutch was rebuilt when the engine was done. VSX parts were used with the exception of new needle bearings. I did not receive the original ones back from Christopher M. after the rebuild so I can not compare the sizes, but I do know I just bought 40 new ones from Scooters O and Gene M. successfully installed them in another SS180 that had a similar problem and now there is no grinding noise from the clutch.
(2) A trick for tightening the brass ring I learned from Tom G. is "Put backing plate down on wooden surface. Screw two sheetrock or other screws in place adjacent to the "ears of the backing plate. The screws keep the backing plate from turning. then you use the tool to unscrew the ring. Use just enough force to get the ring to turn. " I took another approach and used three small headless nails and lined them through both plates and turned the top plate so each locked against the nail and there was no movement. I then tightened the brass ring and could lift the clutch assembly off the wood base. Tom's idea may be smarter as it could be less stress on the two plates. I hadn't reread Tom's note and could not get my Sheetrock screws to fit the holes the nails did.
(3) For the brass ring there is no torque guide and it is unlikely to loosen since it is a reverse thread. I kept my hand directly above the socket (less torque) and tightened it down with one jab. Then I stopped. Brass is not that hard.
(4) What I did notice is that the NOS clutch springs (I point to the NOS ones in the slide show) I just purchased are noticeably taller than the VSX ones. Furthermore, they sit in the cups much more snugly. I wonder what difference, if any, that could cause. I did not receive the original ones back so I could not compare the difference in height or width.

The only question now is if the scoring wear on the bottom of the brass ring nut is acceptable or if it suggest that the needle bearings will eventually wear through enough for the brass ring to fail or to cause binding of the heads of the bearings at low RPMs -- hence the sound between neutral and first gear. I want to know this answer ASAP. Follow-up: spoke with Tom and he said that the ring has wear, but not truly scoring. He said their is nothing wrong with the brass ring as-is.

So . . .

At this point, I guess it makes sense to reassemble the bike and test it. If it works, wonderful! If it doesn't it's not hard to replace the clutch and I will need to buy a new one.

Tuesday, August 9, 2011

Will this clutch work or am I in need of a new one?

Tonight I went over to Derek G.'s house and worked on the cush drive and clutch. We have some concerns about the clutch which need to be answered before I proceed.

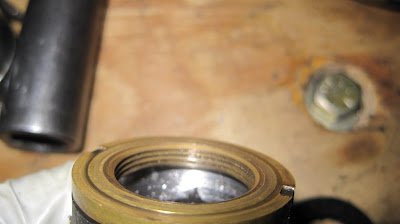
Concern #1: Note the ridges in the bottom of the brass nut. This suggests that the needle bearings have rubbed against the brass ring

Concern #2: When I removed the needle bearings many fell out with a gentle tap, but there is a corner where the bearings would not come out and would not roll smoothly, even when I pushed them. I really pushed hard on these bearings and there was no movement. It took some effort.

When staring straight on at the bearing entrance, you can see that the spacing is not equal around the circumference. This may or may not be the design of Vespa. I don't know. If you do know, please speak up. When I felt the inside of bearing house I could feel an area at the bottom and marginally against the wall that did not feel as smooth as the rest and I wondered if this could be causing the bearings to bind maybe. But when I bench tested it a long time ago I could see the bearings moving through the oil hole.

Concern #3: Another concern I had is that it appears that the needle bearings are too tall and the brass ring nut is resting against the heads of the needle bearings and NOT the clutch surface. If this is indeed true, that could be a big problem.

We did not have any machinist dye to test this theory, but that is a next step.

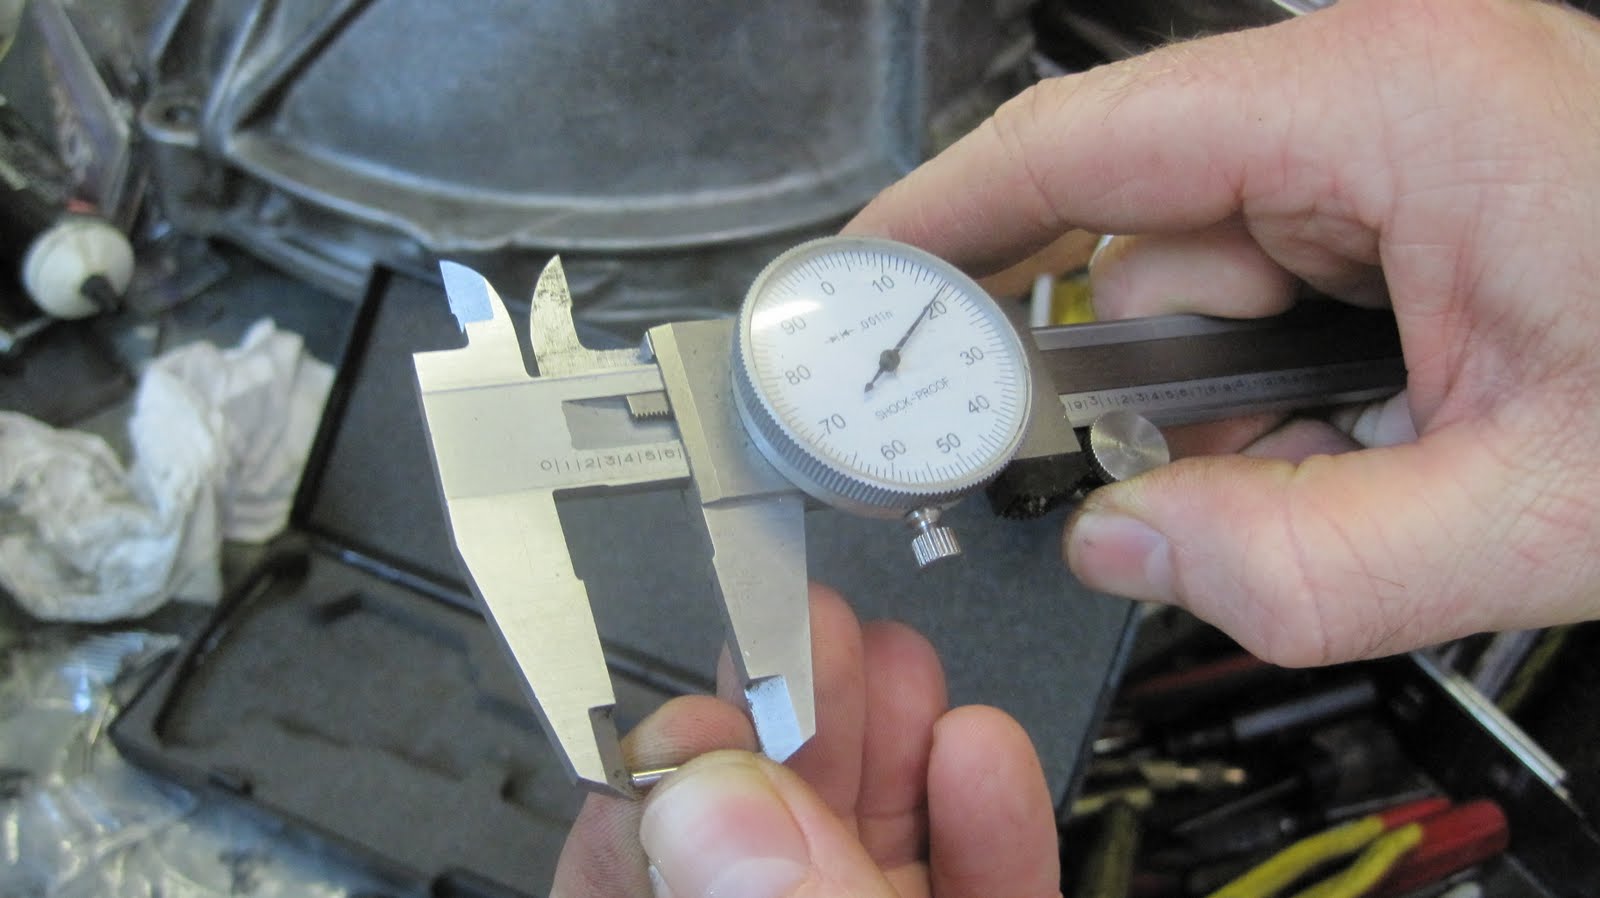
What we did do is to measure the original needle bearing length against the new needle bearing length and they are exactly the same. I wonder though, if my original needle bearings are indeed original. They look in way too good of shape for 10,000 miles on dirt farm roads. I don't remember seeing an invoice when the engine and clutch were rebuilt for needle bearings, but I could be wrong.
Does anyone know the exact length the needle bearing should be?

Follow-up August 10, 2011:
As a back up I found a used stock clutch for $200, which seems too high. I spoke with Steve at ScooterWest and he agreed.

I wrote my mentor Tom G. to give him an update and he recommends a new clutch:

Here is what I wrote:

What I do know is this (after speaking to Steve at ScooterWest):

(1) my brass ring is scored, likely from the bearings touching it.
The NOS ones are perfectly smooth on both sides.
I don't know if this is a problem.

(2) the needle bearings get jammed in one corner of the clutch and
will not come out unless I use a screw driver and push them hard
around the circumference of the race until they loosen up. I am
unable to put new need bearings into the race at the same area and
need to put them in and use a screw driver to move them around the
circumference until they are all installed. The head of the race is
not 100% even around. Some of it is tighter and does not allow the
needle bearings to be removed or installed. Maybe this is by design,
maybe it is not.

I do not know if this is a problem.

The potential concern here is there could be binding of the needle
bearings and maybe that is causing my grinding sound between neutral
and 1st gear *only* because of the lower RPMs.

I hear your advice and it makes sense to just finish putting
everything together and back into the bike.

Jeremy

Tom's response:

That's news to me.
If the needles are binding up, then I'd go with a completely new clutch, since you don't know where the problem is.
I would not buy a used clutch if you can afford a new one.
Either of the SIP ones look good to me. Slight preference for original type . .
Tom

Further thoughts:

Thx again Tom.

I did not disassemble the clutch before removing the needle bearings
this time. Corks and plates and springs were all in place.

Also, I forgot I needed to use the clutch removal tool and followed a
manual two screw driver approach and gave some mild pressure to the
clutch on two sides to free it a couple times and then remembered I
needed my clutch removal tool. So I guess it is possible that I bent
it and caused the binding, but then again the problem existed before I
removed the clutch.

I was able to remove the needed bearings with no effort in the past
and reinstall them with no effort when the clutch was disassembled
:

Could this cause a problem?

Or maybe this is not the problem and I just created a new one. I remember I had no problem reinstalling those needle bearings back in. I don't remember binding. I guess it doesn't matter now since there is binding.

Tom's response:

No way to tell if your prying caused the damage. I'd say unlikely, but conceivable. Also, there is NEVER any reason to remove the ring and needles without dismantling the clutch. That could EASILY have caused your binding problem. Take the clutch completely apart, then reassemble the needles and see if they bind.

Monday, August 8, 2011

New tools


I needed the air palm nailer that Tom G. recommended I buy. While at Harbor Freight I also picked up some other tools I knew I would need in the future. Note that Harbor Freight Tools are not quality tools and are not built to last, but rather if you have a few jobs that will require a limited amount of use over the years you'll be fine and won't beat the price. Non-mechanical tools will work out just fine for you in the long-run as well with more regular use. Copper brushes
for cleaning parts is a wise investment. The air gun impact wrench will be used ONLy for loosing super tight screws during disassembly.

I did see a $20 blue colored mini air palm nailer to use for riveting and I think that would be a smarter choice. It is easier to hold and maybe control. Something to think about.

I hope to tackle the cush drive (aka layshaft) and clutch tomorrow night.